AI Assist Usage
This page allows administrators to view details about their purchased token packages, including the amount of consumed and remaining tokens. The usage page grid can be filtered by user, date, and various other fields. Administrators can track AI Assist activity by reviewing the prompts run by their users
Note: The "Allow user to view AI Assist Usage" user permission must be enabled to see the AI Assist Token Usage page.
Package Details
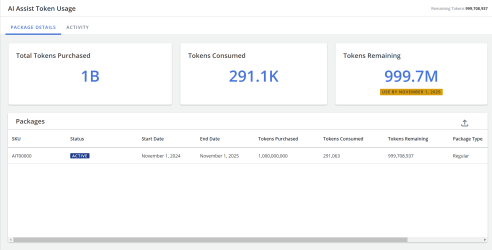
This tab shows a general overview of the purchased token packages. The following information is displayed here:
- Total Tokens Purchased: The total tokens purchase for any active packages.
- Tokens Consumed: The total tokens already used from any active packages.
- Tokens Remaining: The total remaining tokens from any active packages.
- Packages: This table shows the status, SKU, package type, start/end dates, tokens purchased, consumed, and remaining for all packages (active and inactive). You can export a Package Report here.
Note: The "Package Details" tab will not be visible to BYOAI customers that have entered and manage their own AI keys on the AI Assist Connection page.
The Package Details tab. Click to enlarge.
Export Packages Report
- Click the Export
 icon to export the Packages Report as an Excel file.
 - Enter a File Name.
- Click Export.
Activity
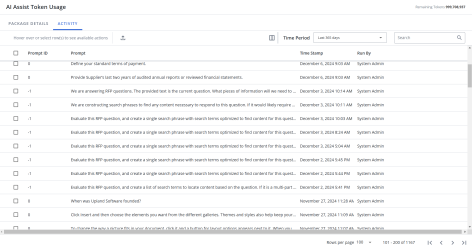
This tab shows the usage history of the purchased token packages. The grid displays the following information:
- Prompt ID: If a saved prompt was run during a file query or analysis, this ID will be shown here.
- Prompt: The text of the prompt that was run.
- Time Stamp: When the prompt was run.
- Run By: User that ran the prompt.
The Activity tab. Click to enlarge.
Work with the Activity grid
- To search for an activity, enter text into the search box at the top right of the grid, and click the Search
 icon or Enter.
 - To re-display all activities in the grid, delete the entire entry in the box by clicking the X.
Use the advanced filters to display specific activities quickly on the grid.
- Hover over the column header until you see the Filter
 icon appear.
 -
Click the Filter
 icon to display the following dialog to set filtering parameters:
- Text Columns: Select either Contains All, Contains Any, Matches Any, Matches Exactly, Starts with, Ends with, Is Empty, Is Not Empty, or Does Not Contain from the Operator dropdown menu. The Contains All, Contains Any, Does Not Contain, and Matches Any operators allows you to enter more than one value by pressing the Enter key after each value. The Starts with and Ends with operators allow you to enter a text value to find. The Is Empty and Is Not Empty operators do not require a value.
- Numeric Columns: Select either Equals, Greater than, Less than, Greater than or equal to, Less than or equal to, Not Equal to, Between, Matches Any, Is Empty, or Not Empty from the Operator dropdown menu. The Between operator shows two fields for the starting and ending values of the range you want to find. Is Empty and Not Empty operators do not require a value. All other operators require a single value.
- Click Apply.
Tip: To clear the filter, click the Clear Filter ![]() icon in the header, and then click Clear. You can also click out of the filter dialog to close it.
icon in the header, and then click Clear. You can also click out of the filter dialog to close it.
- To sort columns chronologically or alphabetically, click the column header name. The rows will display in ascending order.
- To switch from ascending to descending order, click the selected column header name again.
You can show, hide, and order columns to display on the grid.
- Click the Customize Columns
 icon in the top right corner of the grid to display the Columns dialog. The "Manage Columns" dialog will appear.
 - To filter the column list, enter text into the search field.
- Select your desired column(s) using the checkboxes or by clicking the rows and using CTRL+CLICK or SHIFT+CLICK to select multiple records. Select the Select All option from the More Options
 menu to enable all the columns and use the Left
  and Right
  icons to move the columns between the Available and Selected columns to determine which columns will be displayed on the grid.
 - To determine grid order: drag and drop any Selected Columns, select specific column checkboxes and use the Move to Top or Move to Bottom options from the More Options
 menu, or select specific column checkboxes and use the Up
  and Down
  icons to order the columns.
 - Click Restore Default to return to the default settings.
- Click Save to save the changes and close the dialog or Cancel to close without saving changes.
- At the bottom right of the grid, use the page scrolling controls (First page, Previous page, Next page, Last page) to move between pages of records in the grid.
- Select your desired grid row(s) using the checkboxes or by clicking the rows and using CTRL+CLICK or SHIFT+CLICK to select multiple records.
- At the bottom right of the grid, use the "Rows per page" dropdown menu to select the number of rows that you want to display on the grid.
To view activities from a specific time period, select one of the following options from the Time Period dropdown menu:
- Last day
- Last 7 days
- Last 30 days
- Last 365 days
- Between: Enter the From and To dates, up to 3 years, in the mm/dd/yyyy format, or click the Calendar
 icon to select the dates.
You can switch between the default and compact column modes. Unless updated, the grid will remain in default mode. Compact mode shortens the height of the grid rows.
- To switch between the modes, go to My Preferences within the header Profile menu and select the Default and/or Compact radio buttons.
View Details
- To view the details of a specific activity, do one of the following:
- Double-click on the desired row.
- Hover over the desired row and click the View Details
 icon.
icon.
- The Details page will be appear. Navigate between the following tabs:
- Details: Displays the metadata of the prompt, such as: Engine Name, Model Name, Original Prompt ID, Prompt Text, User ID, Full Name, Username, User Email, Stop Reason, Response Date, Edited, Downloaded, Copied, Accepted, Auto-inserted, and Flagged.
- Input: Displays the text entered for the prompt and its completion request information.
- Output: Displays the response text generated by AI against the prompt.
Tip: Text within the Details page can be copied.
Export to Excel
- To export an Excel report on specific activity, select the checkboxes of the desired rows and click the Export
 icon. The file will automatically begin downloading.
 - To export an Excel report on all activity: simply click the Export
 icon without selecting any checkboxes. The file will automatically begin downloading.

